
If you are trying to learn how to beat an ostrich in Manok Na Pula, the key is not simply choosing the strongest rooster and attacking continuously. The Ostrich is designed to punish rushed attacks, making timing, positioning, defense, and strike-bar control important during the fight.
The Ostrich can feel difficult because its attacks have strong reach and can quickly punish a rooster that stays too close for too long. Current community guides commonly recommend watching its attack pattern, waiting for the recovery window, and countering instead of trading hits directly.
This guide explains the fight step by step, including which roosters can help, how to use the strike bar, what mistakes to avoid, and how the modified version can change the encounter.
Why Is the Ostrich Difficult in Manok Na Pula?
The Ostrich is challenging because it combines aggressive attacks with useful reach. New players often make the same mistake: attacking immediately and continuing to exchange hits without waiting for an opening.
Instead of trying to win through constant attacking, treat the fight as a bait-and-counter battle.
The general pattern is simple:
Several current guides describe the Ostrich as an encounter where patience and recognition of its attack pattern are more useful than blindly attacking.
How to Beat an Ostrich Step by Step Strategy
Start by Watching Its Attack Pattern
Do not rush into the first exchange.
At the beginning of the fight, spend a moment observing how the Ostrich approaches and when it commits to an attack. This gives you information about the rhythm of the encounter before you start spending your HP.
The important point is to identify the moment when an attack finishes. That short recovery period is where your counterattack becomes safer.
A common strategy described by current guides is to let the Ostrich commit to its attack, avoid the main impact, and then punish the recovery period.
Do Not Trade Hits Face to Face
One of the easiest ways to lose the fight is to stand directly in front of the Ostrich and exchange attacks.
Even if your rooster has good Attack Power, losing HP unnecessarily can make the later part of the fight much harder. Instead, use a simple bait, dodge, counter approach.
Let the Ostrich attack first when possible. Once its attack has finished, use that opportunity to land your own strike before resetting your position.
Focus on the Strike Bar
The strike bar is one of the most important mechanics to understand in Manok Na Pula.
Rather than pressing randomly, wait for the correct timing indicated by the strike bar. A well-timed attack can turn a defensive moment into an opportunity to deal damage.
If you are still learning the fight, practice the timing rather than trying to finish the boss as quickly as possible. Once the timing becomes familiar, the Ostrich becomes much easier to manage.
This approach also transfers to other battles because timing the strike bar is a broader combat skill rather than something useful only against the Ostrich.
Best Roosters to Use Against the Ostrich
There is no single rooster that every player must use. Your choice should depend on whether you need more survivability, damage, or speed.
Manok Na Taguro
Taguro is a useful choice for players who are struggling to survive. Current guides commonly describe Taguro as a defensive option with strong durability, making it suitable for players who need more time to study the Ostrich’s attack pattern.
The main advantage is straightforward: surviving longer gives you more opportunities to learn when to counter. If you repeatedly lose before you can understand the attack rhythm, a defensive-oriented rooster can make the learning process easier. Read here next Article unlocked chickens.
Manok Na Hokage
Hokage provides another approach.
Rather than relying entirely on defense, it can be used by players who want a more balanced combat style. Current Ostrich guides describe Hokage as a balanced option for controlling distance and maintaining consistent attacks.
This makes it suitable for players who already understand the basic timing but want a more aggressive counterattack style.
The Best Strategy for Beginners
If this is your first serious attempt, do not focus on defeating the Ostrich as quickly as possible.
Use this beginner sequence:
Observe → Defend → Dodge → Wait → Counter → Repeat
Your first goal should be learning the attack rhythm.
Once you can consistently recognize when the Ostrich finishes its attack, you can start increasing your damage output. This is more reliable than repeatedly entering the battle with the same aggressive strategy and hoping for a better result.
A defensive rooster such as Taguro can also provide more room for mistakes while learning.
Common Mistakes When Fighting the Ostrich
Starting an attack before the Ostrich finishes its movement can leave your rooster exposed.
Wait for the opening instead of creating unnecessary trades.
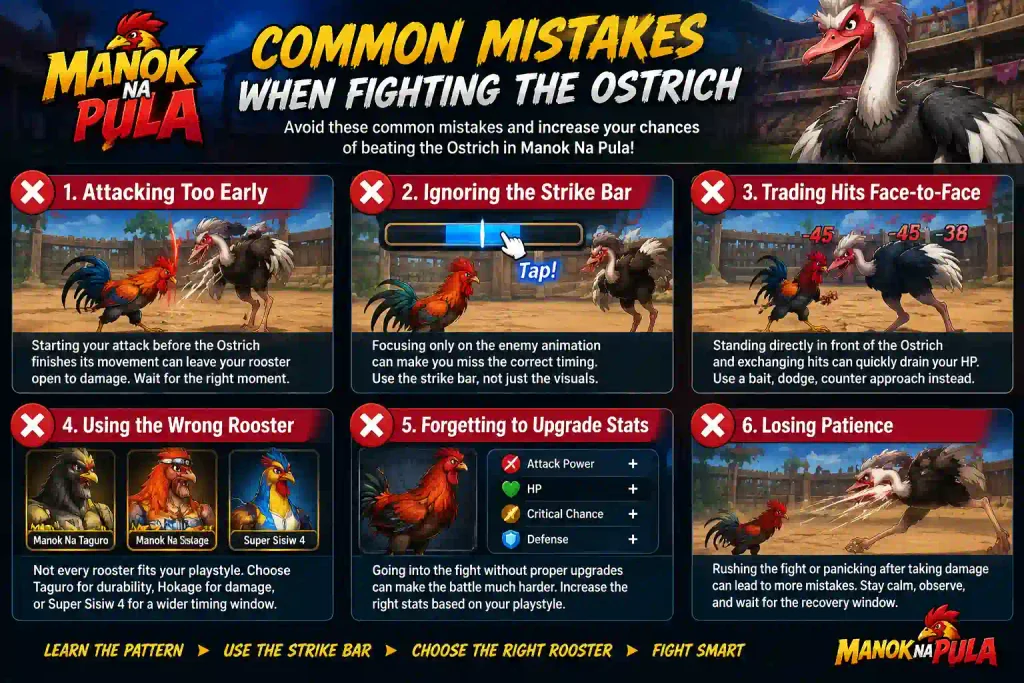
Ignoring the Strike Bar
If you are focusing only on the enemy animation, you can miss the actual timing required for your attack.
Keep your attention on the combat interface and strike timing.
Using the Same Strategy After Losing
If you lose several times, changing the rooster alone may not solve the problem.
- Did you take too much damage early?
- Did you attack during the Ostrich’s active phase?
- Did you miss the strike-bar timing?
Attacking Too Early
Wait for the opening instead of creating unnecessary trades.
How the 1-Hit Ostrich Feature Changes the Fight
Players using certain modified builds may encounter a 1-Hit Ostrich or One-Hit Ostrich Kill feature.
Current mod focused pages advertise this feature as a toggle that can reduce the boss encounter to a single attack. The exact availability and behavior can depend on the particular modified build, so it should not be treated as a standard feature of the official game.
If the option is present in your build, check the mod menu before entering the fight and verify what the specific toggle actually does. Mod menus can differ between versions, and older community builds have documented changes or temporary removal of the 1-hit Ostrich option.
For players using the standard game, the normal strategy remains based on timing, positioning, and counterattacks.
Does the Ostrich Become Harder?
Some community sources describe dedicated Ostrich encounters as having increasing difficulty across repeated battles. One current guide describes Ostrich Match as a mode where successive encounters become stronger.
That means a strategy that works at an early difficulty may need stronger stats and better execution later. Instead of depending completely on a single high-damage attack, build a repeatable strategy that still works when the Ostrich survives longer.
Does One-Hit Kill Work in Every Mode?
You should not assume that a mod feature works identically across every mode. Community mod documentation has shown that features can be added, removed, or marked as temporary depending on the build. For example, an older documented mod menu specifically listed the 1-Hit Ostrich feature as temporarily removed.
Therefore, always check the actual feature list of the build you are using rather than relying on a feature list from an older APK or mod menu.
Final Thoughts
Learning how to beat an ostrich in Manok Na Pula is mainly about controlling the pace of the fight. Do not treat the encounter as a simple damage race. Watch the Ostrich’s attack, avoid unnecessary trades, use the strike bar carefully, and counter when the opening appears.
For beginners, a durable rooster such as Taguro can provide more room to learn. Players who prefer balanced combat can consider Hokage, while Super Sisiw 4 can suit a faster counter-based approach.
Modified builds may provide a 1-Hit Ostrich option, but the feature is version-dependent and should not be confused with a standard game mechanic.
Once you understand the Ostrich’s rhythm, the fight becomes less about repeatedly losing and more about recognizing the same attack-and-counter pattern. That skill can then help you approach the other major Manok Na Pula boss encounters with better timing and preparation.